
Puget Systems assembles really nice custom PCs and especially great quiet PCs. However, when I last priced out a system I wanted to build, it was well outside of my budget (by about $1500USD).
So, I built my own.
It was an experience that took several months to research and to gather the right desired parts.
My requirements list included:
- Quiet
- Modern processor with many cores
-
More RAM than my software would need… apps like:
- Visual Studio 2019
- Visual Studio Code
- Rhino 6 (3d)
- ZBrush 2019
- And all the tabs I keep open in Chrome (ha ha!)
- Bitlocker ready for disk encryption
- Decent graphics card, modern CUDA support for Machine learning via GPU
- Quiet
A modern desktop processor runs HOT. And to keep that processor cool and quiet, you’ll need a good case and a number of cooling solutions. My previous Puget Systems desktop PC relied on liquid cooling, but after a significant amount of research, I decided that fans would offer the same amount of cooling and often be as quiet (or more quiet) than the liquid cooling system. (I’m sure there are examples where the inverse is true, but I had a budget!!).
So, in no particular order:
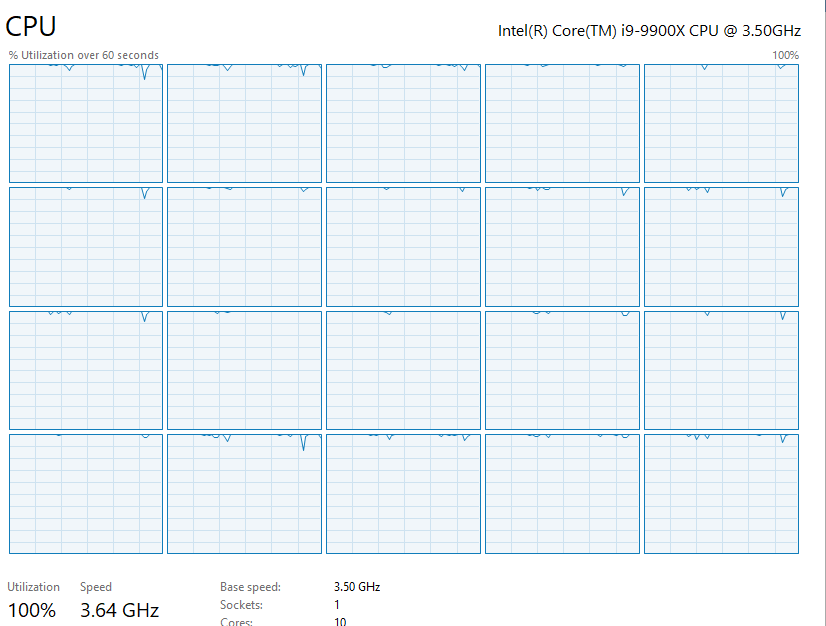
Intel Core i9-9900X X-Series Processor 10 Cores up to 4.4GHz Turbo Unlocked LGA2066 X299 Series 165W Processors (999AC5)

The i9-9900x was high end, but not crazy high end. I gave up trying to decide between the X and the K series. The X supported:

But, here’s some video encoding…. the cores are bit busier when using queues in Handbrake.
MSI Performance Gaming Intel X299 LGA 2066 DDR4 USB 3.1 SLI ATX Motherboard (X299 Gaming PRO Carbon)

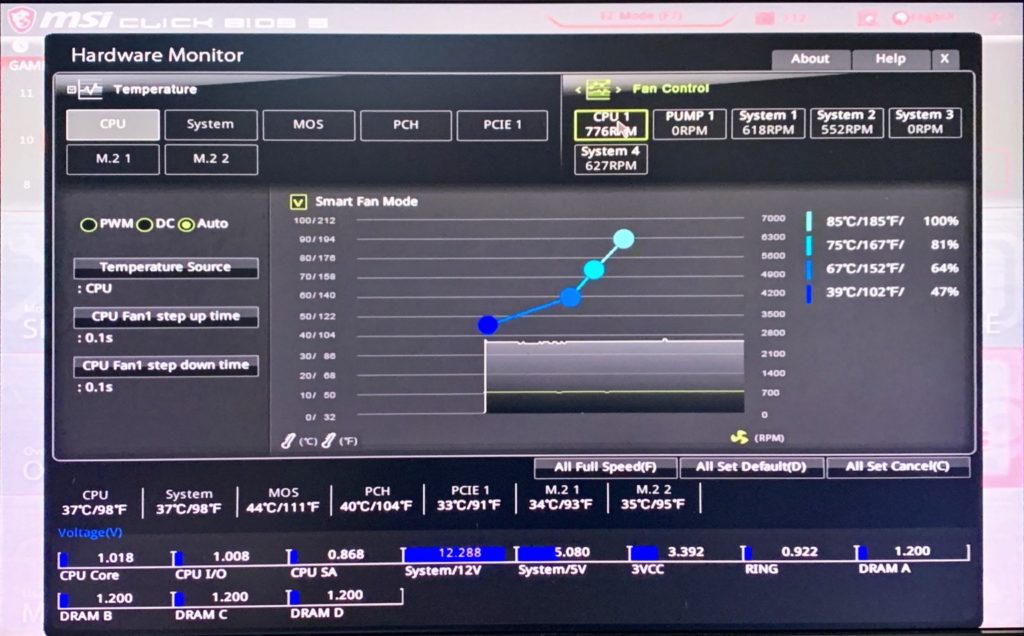
Choosing a motherboard was a long process. You’ll want to read reviews, but I couldn’t find a single motherboard that was amazingly well rated and had the limited features I needed (mostly the ability to enable bitlocker). I went with MSI as it’s a decent brand, had extended support for RAM (I went with 64GB) and didn’t have too many bells-and-whistles. It has a lot of fan control for local (temporary) in PC changes and as many in the BIOS settings.
I’ve set the BIOS settings to control the fans such that they are quiet except when the CPU is running really hot.
You can also enable the Trusted execution environment settings to enable bitlocker without buying a TPM chip (and trust me!!! buying a TPM chip is a lot more challenging than you’d think — they’re often out of stock or the wrong model. I gave up and went with this on board option).

Why is Bitlocker so important to me? Drives fail. Warranties work. I’ve owned a LOT of HDDs and SDDs over the years and had many fail under warranty. I have no concerns about sending in a drive if the contents are completely encrypted. Hence Bitlocker. Built in. Reliable.
Noctua NF-A14 PWM, 4-Pin Premium Quiet Cooling Fan (140mm, Brown)

I knew I wanted some of the best fans in the new case … and these are very highly rated everywhere. I haven’t been disappointed. I ordered 6 of these to replace the built in case fans in my new desktop case (and actually only used 5 as I couldn’t find a spot for the sixth that did any good). The general advice, buy an odd number, so that you’ll have more air pulling through.
Corsair LPX 16GB DDR4 DRAM 2666MHz C16 Memory Kit CMK16GX4M1A2666C16

I bought 4 sticks of this in black. The recommended clock speed for RAM with the i9-9900 and the motherboard is 2666MHz. So, that’s what I bought. I don’t want to destabilize my PC. Again, a super highly rated brand and model of RAM. It’s called Vengeance — so it must be amazing, right?
EVGA Supernova 750 PQ, 80+ Platinum 750W, Semi Modular, EVGA ECO Mode, 10 Year Warranty, Power Supply 210-PQ-0750-X1

Lots of good ratings, 80 PLUS Platinum certified (so less wasted energy). It had plenty of power connections for all the accessories I wanted to use.
Samsung 970 PRO Series – 1TB PCIe NVMe – M.2 Internal SSD Black/Red (MZ-V7P1T0BW)

Big primary drive. Fit nicely into one of the M.2 slots on the MSI motherboard. Screaming fast and amazingly good reviews. Highly recommended. Further, I liked the fact that this has a 5 year warranty (which isn’t as common in drives these days unfortunately). If it fails, I’ll get it replaced and won’t worry about my data — Bitlocker. :)
ASUS ROG Strix GeForce GTX 1660 Ti 6GB Overclocked Edition

Graphics cards are amazingly high priced these days. I wanted something that supported modern CUDA/Tensor/Deep learning tools, so I couldn’t start at the bottom of options. I have 3 large displays, so I needed the multiple monitor support. It’s also been noted that this is a normally quiet graphics card. I’d agree — I’ve never heard it spin up in the last 3 months of using it. It stays cool enough in my PC case apparently.
Don’t get confused by Amazon’s “there is a newer model” for this or other graphics cards. I’m not sure what system creates those links, but they’re more often than not, not a newer graphics card and instead just a different model.
I’m not a PC gamer anymore, so I can’t speak to its gaming street cred. I’m sure there are plenty of thorough web sites that can do it justice if you’re interested in that.
Noctua NH-D15, Premium CPU Cooler with 2x NF-A15 PWM 140mm Fans

Make sure your case and fan configuration will allow a beast like this. This is a great way to keep the CPU cool, but it requires a substantial amount of headroom.
There may be blood.
Also, the metal fins, they’re SHARP. Like, I cut myself twice getting the thing arranged and installed.
The Case
I bought a monster case for this thing.
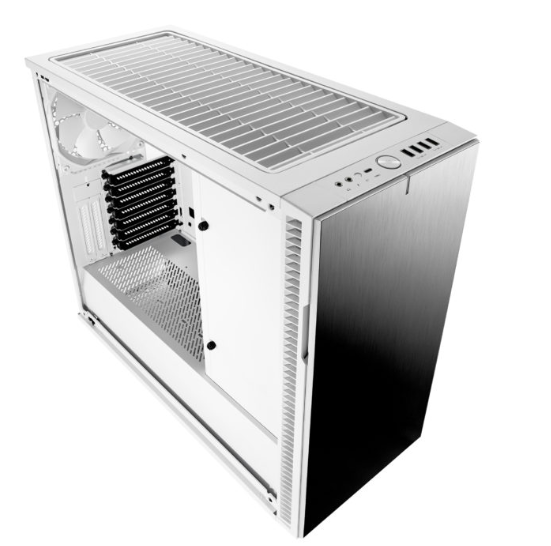
If you have space, buy a big case. You’ll be able to get more fans (running at slower speeds). If you don’t, you’ll really need to be careful that the components you’ve selected fit in the case.
Noise
Out of the box, with default settings, this combination will have a substantial amount of fan noise. I thought I’d messed up it was so loud.
The default configuration seems to want to keep the CPUs at about 35C, regardless, so the fans will spin up. I adjusted the fan settings to ramp up the fans around 55C and rarely do the fans become more than a whisper in the background (and when they do spin up, it’s temporary). Make these changes in the BIOS and not just using the desktop software as the desktop software isn’t “permanent” settings.
I’m super happy with the results of the build so far. It’s been running solid since late June 2019.
Bar none, this is the fastest PC I’ve ever owned. By the way, I contemplated buying a gaming ready portable laptop as making that my desktop, but the prices and lack of upgradability made me rethink that option completely.
Price
Total price of all components (and a few minor things I bought to make the assembly and fan control simpler) was very close to $3200 USD. Assembly time was about 3 hours. If I’d planned the fans a bit better from the start, it would have been a little less than 3 hours. I hadn’t built a PC in more than 10 years, so I was familiar, but very rusty.
Again, I’d highly recommend Puget Systems and have purchased 3 of their computers in the past, but it was time to build my own again. I’m glad I did.
Please help support this site by using the Amazon product links. Thanks!
One public service announcement — buy a backup drive for your data, or pay for a cloud service if you trust them and have the bandwidth and no data caps

And use BITLOCKER (or other OS equivalent). Don’t just copy files to it. If it dies (and it may), you should not want to send it in for warranty service if the files aren’t encrypted.
I’ve got the external drive I linked to set up as a Windows 10 File History destination.